The Perfect Picot
Included in this post is a short tutorial for a simple and effective way to add a little something extra to your crochet projects. The Perfect Picot stitch! Please find instructions below for sample swatches and a Snowflake.
Picot crochet is essentially creating peaks or nubs standing out from the crochet stitches. The appearance of these little peaks can add another dimension to the project as shown in the designs below.

I love Picots, they are perfect for edgings on everything from baby blankets to sturdy bags and purses to lacy accessories and garments. Picots can even be used within the pattern stitch as well as on borders and edgings.
What is a Picot? A picot is a small bump or loop that's made by chaining a few stitches and then joining them back to the main fabric. It's a decorative element that can add a lovely touch to your crochet work.
Read on to learn to make The Perfect Picot and to get inspiration and suggestions from patterns that feature the picot stitch.
The Perfect Picot Edging is created by working the number of chains called for in the pattern, usually three, then working a sl st into the two front loops at the base of the single crochet (sc) just made or the two front loops at the top of the double crochet (dc) or the triple crochet (tr) just made.
I prefer this method of placing the sl st in the front lp of the stitch just made as it keeps the perky little Picot standing up and in its proper place.
In essence, The Perfect Picot is a small bump or nub that is made by chaining a few stitches and then slip stitching (sl st) back into the front lps of the stitch just made.
Practice the Picot Stitch
The practice samples below are crocheted with Anti-Pilling Everyday DK (a lovely DK weight or size 3 yarn) from Premier Yarns using a U.S. size G crochet hook.
Single Crochet Sample
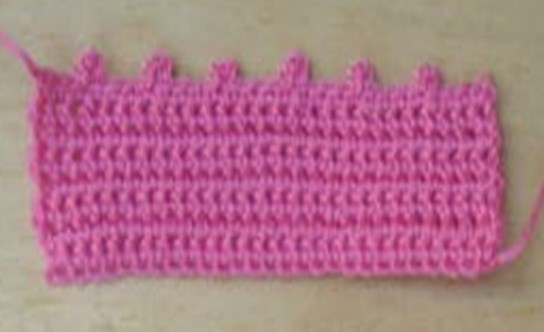
Special Stitches Used: Picot - ch 3, sl st in the two front lps of the sc just made.
Instructions: Foundation Row: Starting at bottom edge, chain 28, sc in 2nd ch from hook and in each ch across = 27 sts. Ch 1, turn.
Row 1: Sc in each st across = 27 sts. Ch 1, turn.
Rows 2-6: Repeat row 1.
Edging row: Sc in each of first 3 sts, * Picot (see Special Stitches Used above), sc in each of next 3 sts. Repeat from * 5 times. Fasten off.
Granny Stitch Sample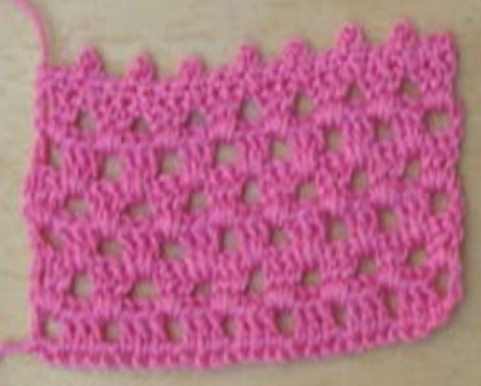
Special Stitches Used: Picot - ch 3, sl st in the two front lps at the top of the dc just made.
Instructions: Foundation Row: Starting at bottom edge, chain 34, dc in 6th ch from hook, dc in each of next 2 chs, ch 1, (sk next ch, dc in each of next 3 chs, ch 1), 6 times, sk next ch, dc in last ch = 8 ch-1 sps. Ch 3, turn.
Row 1: Sk first dc, 2 dc in next ch-1 sp, ch 1, (3 dc in next ch-1 sp, ch 1) 6 times, 3 dc under turning ch = 7 ch-1 sps. Ch 4, turn.
Row 2: Sk first 3 dc, (3 dc in next ch-1 sp, ch 1) 7 times, sk last 2 dc, dc under turning ch = 8 ch-1 sps. Ch 3, turn.
Repeat rows 1 and 2 once, then repeat row 1. At end of last row, ch 1 and turn.
Edging Row: Sc in each of first 3 dc, Picot (see Special Stitches Used above), sk next ch-1 sp, * sc in each of next 3 dc, Picot, sk next ch-1 sp. Repeat from * 5 times, sc in each of next 2 dc, sc under turning ch = 7 Picots. Fasten off.
A Different Picot Stitch Edging
The basic Picot stitch is usually made with a chain of three sts. If you want your Picots to be more noticable, as in the edging on the snowflake below, simply chain more stitches and join with a sl st in the same manner.

Snowflake
Materials and Tools: The snowflake is crocheted with Paintbox Yarns Cotton DK (a 100% cotton yarn) from Love Crafts using a U.S. size F crochet hook.
Instructions: Starting at center of motif chain 5, join with sl st to form a ring.
Rnd 1: Ch 4, (counts as first dc and ch-1 sp), (dc in ring, ch 1) 11 times, join with sl st in 3rd ch of beg ch-4 = 12 ch-1 sps.
Rnd 2: (Sc in next ch-1 sp, ch 3, sc in next ch-1 sp, ch 5) 6 times, join with sl st in beg sc = 6 ch-3 lps and 6 ch-5 lps.
Rnd 3: Ch 1, sc in next ch-3 lp, ch 1, 4 dc in next ch-5 lp, ch 4, sl st in two front lps at top of dc just made, ch 5, sl st in same sp, ch 4, sl st in same sp, 4 dc in same ch-5 lp, * ch 1, sc in next ch-3 lp, ch 1, 4 dc in next ch-5 lp, ch 4, sl st in two front lps of dc just made, ch 5, sl st in same sp, ch 4, sl st in same sp, 4 dc in same ch-5 lp. Repeat from * 4 times, ch 1, join with sl st in beg sc. Fasten off.
Finishing: Work in all ends.
Use Picots for Joining Motifs

This boho-chic shoulder bag uses Picots in the joining of the traditional granny squares. The boho-chic style has become very popular in crochet with a distinct personality of its own. Using Picots in the joining of the traditional granny squares in this Classic Boho Shoulder Bag makes the boho look really pop out.
Please go to the Pattern Collections pull-down menus at the top of the Home page. You will find pull-down menus for Patterns for Hats, Patterns for Bags and Purses, as well as patterns for crochet wearables and home decor. Since Picot stitches are one of my favorite decorative techniques, many of my designs include The Perfect Picot stitch. I hope I have inspired you to pick up yarn and hook and create Picots!
I hope you have enjoyed this tutorial on the Perfect Picot and have been inspired to give picots a try. Once you have mastered the stitch, you can use picots on pretty much anything. They make an excellent border for a blanket and they are also good for edging almost anything from purses and bags in a sturdy yarn to adding a lacy look on garments.
Best crochet wishes,
Nancy
Abbreviations
beg - beginning
ch or chs - chain or chains
dc - double crochet
sc- single crochet
sk - skip
sl st - slip stitch
sp or sps - space or spaces
st or sts - stitch or stitches
Notes
1. A * shown in a pattern row denotes that the stitches shown after this sign must be repeated from that point.
2. Round brackets ( ) enclosing a particular stitch combination denotes that the stitch combination must be repeated in the order shown.
3. Square brackets [ ] enclosing a particular stitch combination denotes that the stitch combination must be repeated within a stitch combination in the order shown.
4. A slip stitch is a non stitch and does not count as a stitch.